OneDesk has many tools that will make your life easier – every day. One way OneDesk does this is by automating ticket-assignments so that your team can get to work on them with only the briefest of delays. Here are some ticket-assignment strategies that you can implement right now in OneDesk.
Assign by Round-Robin
With this assignment strategy, you can automatically assign incoming tickets by rotation to each member of a group you define. This will evenly distribute tickets amongst your team members and although some tickets may require more work than others, it usually averages out pretty fairly over time.
How to do it in OneDesk:
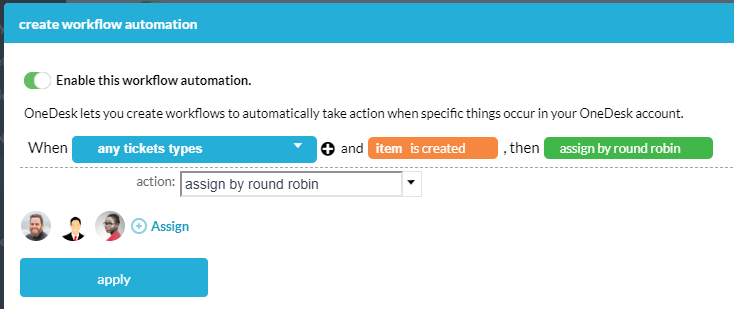
Navigate to ‘Administration > Tickets > Workflow Automations’ and create a new automation as follows:

For the Action (green), select “Assign by round-robin” action and choose a group of users or teams. The round-robin starts with the first person on the list and rotates through it. If you modify the list it will start again at the beginning.
You can have more than one automation, each with a different round-robin group. This will permit you to assign one type of ticket to one group and a different type of ticket to another group. Assigning to a team will assign to the team itself not the individual users in the team. To assign to users you will need to select them individually.
Assign to Team
Another popular strategy is not to assign to individual agents but instead assign to a team. Agents will then pick from the team queue (or ‘view’), assign it to themselves, and remove the team assignment. This will remove it from the team queue and add it to their own.
How to do it in OneDesk:
Navigate to ‘Administration > Tickets > Workflow Automations’ and create a new automation as follows:
For the Action (green), select ‘Add assignee’, and select a team from the list.
Manual Triage
This strategy is useful when your agents are somewhat specialized and a human is required to select the best person for the job. While this necessarily inserts a delay, it can save time in the long run by ensuring that the appropriate individual gets the right ticket.
How to do it in OneDesk:
In OneDesk create a view (or queue) for Not Assigned. To do this navigate to the Tickets App and click the New View icon next to ‘My Views’. Create the view as follows.
All tickets that are not assigned will appear in this view. You can also add columns and sort so that you have the view arranged in the way that is most useful for you. Use bulk edit and macros to quickly assign multiple tickets with only a couple of clicks.
Named Agent
This strategy is used when a named individual is taking care of all the tickets from an account. Therefore if any new tickets come in from a specified customer organization, it will be assigned to this agent.
How to do it in OneDesk:
Navigate to the ‘Customers App’, select the customer organization, and view details. On this page add a new routing action to ‘add assignee’. Now whenever a new ticket comes in it will automatically be assigned to the selected person. If you add an email domain to the customer organization (on by default), then even if you haven’t seen a requester before OneDesk will still detect that they belong to the correct organization and assign correctly.
Other approaches
Often some blend of the above strategies will work best for your company. Here are some ways you can combine the approaches above.
- Use your own filters to determine who the assignee or assigned-team is, including by priority, by ticket-type, and more.
- Use keywords in your filtering rules to automatically assign incoming tickets to specific agents – perhaps based on their areas of expertise.
- Use filters to push incoming tickets to projects. Then use a separate round-robin automation to assign project tickets amongst project members.
- Re-assign tickets that have not been updated in a while to a different team or a manager.
Do you have any other auto-assignment strategies that you use at your company? OneDesk may be able to do it, and if not, we are interested in considering it for a future release. So please let us know by chat, email or discussion post.