
In the latest version of OneDesk we have made big changes and new features to the customer portal. Since there is a lot you can do, this post will walk you through what’s new (and what’s old) about the customer portal.
Customizable forms on the Customer Portal:
A very very popular request we received was to allow customized ticket submission form on the customer portal. Well here you go!
- You can add whatever fields you want to the customer portal form, even custom properties.
- You can have multiple different forms; one for each type of item you want to allow your customers to submit. Each can be customized independently.
- You can make properties required on the form.
- You can have just forms without the rest of the portal.
- You can customize the property labels, form title, and subtitle.
Improved appearance customization:
- Simplified color scheme is easy to customize with just a couple of clicks.
- Upload your logo.
- Improved widget to embed the portal on your website. now you have parameters to control the button text, color, font-size, placement, and more.
New ways to control who sees what on the portal.
Since every company wants to do a slightly different thing when it comes to showing tickets, knowledge-base articles or project tasks on their customer portal, it is critical that we provide very flexible controls for this. At the same time, the greater the complexity of the controls, the more difficult it is to explain how to set up the portal. In this release we took a step back and re-organized the way we explain our customer portal options. We also added a few new options to cover a few customer use-cases that have come up. While I am sure there are still a few “edge cases” that we have not covered, we have made big improvements here.
Allow visitors to …


view previously submitted items
This turns on the ability to view tickets in the portal. if you just want a ticket submission form, turn this off.
submit new items: when logged in / when not logged in / never
This control lets you decide if your visitors can submit new tickets, and if so, if they need to log in to do so.
What can the customer do on the portal?
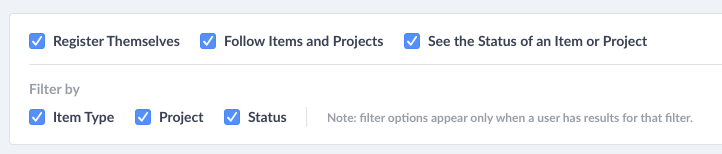

Register themselves
This option allows the user to sign up and create an account on the customer portal. If your portal is invitation-only, uncheck this.
Follow items
This option allows visitors to add themselves as followers on tickets or other items. When they are followers, they will be notified of any new “public” comments posted on this ticket.
See the status of an item
This will show the current status of the ticket to the visitor. If you prefer to keep this information private, uncheck this.
filter by item type / project / status
These options show filter links on the left sidebar of the portal. For example, they can click the project name and see the items that are in that project.
Note: A given filter option will only appear if there would be a result for the visitor if they clicked that link. So for example if the visitor does not have access to any items in “project-A”, then there will be no link for “project-A” in the side-panel for them.
What items can the visitor see on the portal?
Require login to see items
If this is checked, then the visitor must log in to see items. If unchecked, then they can view the items anonymously. You must check this box if you want different visitors to see different things. See next option.
Visitor is allowed to see:
- Their own requested items -> Visitor sees only the items where he is requester.
- Items requested by customers in their organization -> Visitor sees items requested by himself or the other customer in the same organization. You will need to group your customers into organizations for this to work correctly.
- Items in the projects they are following -> If you have added customers as followers to projects and use this option, then the customer will see published items in those projects.
- Items created by customers in their organization & items in the projects they are following -> This combines two options above allowing them to see BOTH OF the items requested by customers in the same organization AND items in projects they are following.
- Their own requested items & items in the projects they are following -> This also combines two options allowing them to see BOTH OF their own requested items AND items in projects they are following.
- All published items -> All items marked as “published” are visible to the visitor, even if they are not the requester, and in any project.
Visitors can always see their own items. If this is checked, then the requester of an item will still be able to see it on the portal, even if it is not marked as “published” and regardless of the project it is in. These will appear under the “my items” link on the customer portal for the users. For an item to be visible to other users it must be flagged as published.
Items in archived projects are not visible and when you archive a project they become “unpublished” so you will need to republish them if you unarchive a project and want them visible on the portal again.