The widget provides a simple, one-off integration with your website. Once integrated, you can configure the widget from your OneDesk without any additional updates to your website. The widget gives customers access to several customer applications, displayed as tabs within the widget. These apps are: the messenger, portal, webforms, and knowledgebase.
How to Embed the Widget
The widget can be embedded onto your website or intranet through a JavaScript snippet.
Step 1: Go to Administration -> Customer Apps -> Classic App Settings -> Scroll down to Put the widget on your website -> Click on Generate Snippet
Step 2: Add the generated script to one or more pages of your website before the closing body tag.
If you would like the apps on all pages of your website, we recommend adding the script to your page footer.
If your website is on WordPress, you could use the WordPress plugin. For detailed instructions please see: Installing the OneDesk Widget on WordPress
If you use Joomla, you could use the Joomla plugin.
To embed using iFrame, please see: Using an iFrame
How to Add/Modify Apps
You can create multiple separate Portals, Webforms, or Knowledgebases, all within one widget. You can also hide any of these apps from the widget or disable an app entirely.
By default the widget contains the following apps:
Messenger – Serves as a live chat between you and your customers
Portal – The main interface where your customers log in to check on the status of their tickets, ask questions, and collaborate with you.
Webform – Allows customers to submit tickets or tasks to you.
Knowledgebase – A self-service/FAQ section for your customers or an internal knowledge base for your team.
Create New Apps
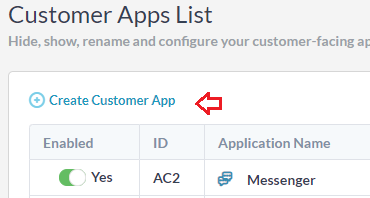
Step 1: To create additional apps go to Administration -> Customer Apps -> click on Create Customer App.
Step 2: Name your new app and select the type of app you want to create.
You can individually configure each app within its own customization tab. These customization setting will open automatically upon creation if you select Navigate to App Settings

Disable Apps
Step 1: To disable an app go to Administration -> Customer Apps.
Step 2: Toggle off the app under the Enabled column
Apps are not deleted, and can be reactivated by toggling on Show Hidden Applications and re-enabling the app.
If you prefer to delete the app, select the trash icon under the Actions tab. This action will erase any settings you’ve applied. If you change your mind, you will need to create a new app.
Hide Apps
You can hide apps from displaying inside the widget without disabling them. This will allow you to still use the apps by providing customers a direct link.
(The link for each app is found in the Customer Apps List under the Customer Access URL column.)
To hide an app, ensure the app is enabled in the Customer Apps List. Then go to the Website Widget tab. Here you will see all your apps within the gray bubbles under the Add Customer Apps to Your Widget section. Disabled apps are shown in lighter grey.
To hide an app from being displayed in the widget click the X.
You can make an app visible again by clicking on Add.
The above section displays all your available apps.
Apps in light grey are currently disabled and must be re-enabled in order to be displayed within the widget.
Widget Appearance/General Configuration
To adjust the widget icon, go to Administration -> Customer Apps -> Website Widget
The widget can be displayed as either a large bubble or small bubble.
The large bubble has custom text you may configure, as well as the option to choose a user avatar. If no avatar is chosen the speech bubble icon is displayed. To create a unique avatar image separate from your actual users, you can also create a ‘dummy’ user.
To configure the colours and logos within your customer apps, go to Customer Apps -> Appearance
Additional Configuration
You can require customers to login to use most of the apps. Customers may register themselves or you can invite customers through the customer’s application. To toggle this permission, go to Customer Apps -> scroll down to Customer registration.
Customization of each of the customer apps is available within the apps setting under Administration.